metroMe
Concrete5 Responsive vCard Theme
- created: July 4th 2013
- latest update: September 10th 2013
- by: tudor_sv
- email: savatudor@yahoo.com
Thank you for purchasing my theme. If you have any questions that are beyond the scope of this help file, please feel free to email via my user page contact form at themeforest . Thanks so much!
Installation
Anxious about seting up your site? Good...
This is the most difficult part.
However, editing, adding content to your site and customizing the theme will be a pleasure. I promise !
Here are the main steps:
- a) install concrete5 CMS
- b) install the metroMe package
a) Install a fresh copy of Concrete5.6 (not Concrete5.7 !) on your host/server. If your preferred host does not have a one-click installer for concrete5 like Softaculous or SimpleScripts, you will need to take some steps to manually install concrete5.
To manually download and install concrete5, get it from here. And then, follow the steps described by the concrete5 crew.
Once you've installed concrete5 on your server you can move to step b) .
b) Using an FTP client(FileZilla) or the cPanel file manager, upload the theme_metro_me_c5.zip from the /MMC5/ folder to the folowing destination on your server: /your_concrete5_installation_directory/packages/.
Extract the zip file there.
Nice... Now visit your site in a browser. (www.your-domain.com/your_concrete5_installation_directory/index.php or www.your-domain.com/index.php if you've installed C5 at the root domain folder). Login. If you can't find a login button, simply add "/login" after "...index.php" in your browser's address bar and GO(press Enter).
If you are hosting on godaddy (or possibly even other hosts, like siteground) you might get a "No input file specified" error when you try to acces the login or dashboard pages of your site. To fix this, copy my php5.ini file to the root of your site or if there already is a php5.ini there, just add a new line to that file:
cgi.fix_pathinfo = 1
I have had some headaches and spent some hours finding this solution... In the case of godaddy hosting, it will take somewhere between 20 to 45 minutes (they say) for the changes made to the php5.ini to take effect. So you will have to wait a while if that is the case.
So, Login with the username and password you created during the concrete5 installation.
Now you should be able to see the concrete5 bar at the top. You are now just a few clicks away from installing my theme. Hover on the Dashboard button and click Extend concrete5. The Add functionality dialog-box shoud appear. At the top you should see: MetroMe C5 theme and blocks. click install. Wait a few moments.If you reached so far I congratulate you !
Your site should be working perfectly now !
Visit it in a browser and let's move to the next chapter.
Login and Edit
To start editing your site, you first need to Log in.
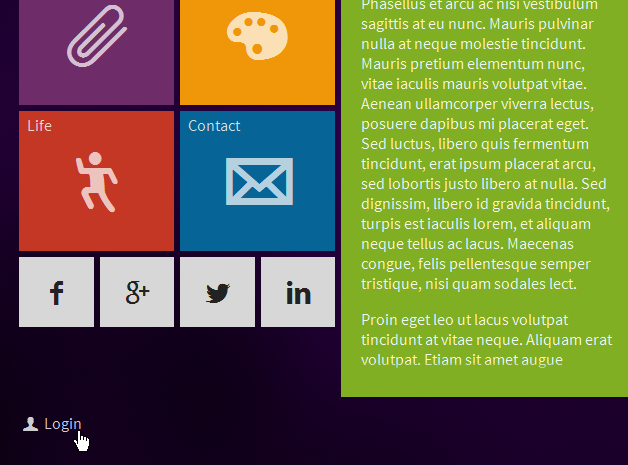
I've created a hidden button for you (the site admin) to easily access the login page. It's located on the lower left side of the page. It will reveal it's self only when you hover on it.
Otherwise you can acces the login page and the dashboard page with these URLs:
http://blablabla.bla/index.php/login
http://blablabla.bla/index.php/dashboard
Use the login credentials that you've created before the concrete5 installation.
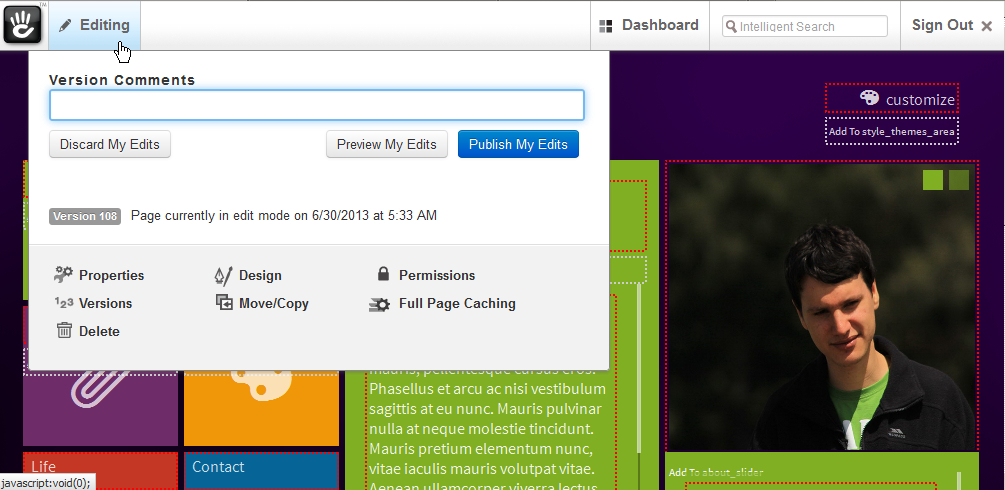
After you login, you should see the default concrete5 bar at the top of the page. Click Edit and let the fun begin.
Now your page is in Edit mode and it looks a bit odd ... Don't worry about it. It will only look this way for you (the admin) only while you are editing it.
After making the necessary content modifications (which I will explain below), you need to save these modifications. Hover on the Editing button and click Publish My Edits. You can do this either after each significant modificaton you make (recommended) or at the end of all your modifications.
Now let's start editing and adding content. Shall we?
File Manager and Images
We will start by learning to upload via the File Manager. Go to Dashboard > File Manager, or just type "File manager" inside the Intelligent Search field and click on File manager.
As you can see, you can browse (your personal computer) and upload a single file, or you can upload multiple files. It's really easy. All the images you will use for the sliders and including any desired background for the theme will have to be first uploaded via the File Manager to be available for use in blocks. So go ahead and upload some of the images you will be using. Don't worry. You can also upload while inside the editing dialog box of a block. As you will see later.
Another very useful feature of the File Manager is the ability to organize your uploaded files (images in our case) in file Sets. You can think of them as Folders or more correctly Filters that permit you to filter files(images) by keyword. When you decide to upload the images that will go into the Synchronized Sliders: Projects & Galleries on the Works and Life sections, you should upload multiple images at once and give them the same file Set. For example all the images on the Design slide have the "design" file Set assigned to them. This allowed me to add them to my slider much easier (I explain exactly how in the Works chapter below).
Before we advance, I recommend you upload at least an image using the file manager. This has the effect of displaying images when you edit the sliders and after you save them for the first time.
Menu and Socials
On the left side of the page there is the vertical navigation menu and the social icons menu. You can edit each of the menu items and social items.
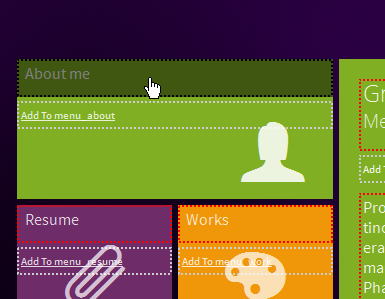
To actually navigate while in Edit mode, click on the lower half of any of the menu items and the corresponding tab should appear.
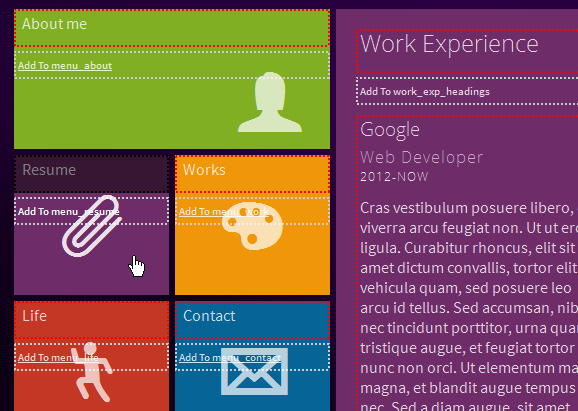
Menu items can be named however you want (corresponding to their intended content of course) and you can also change their icon. So you could rename the Works section to Portofolio, if you prefer.
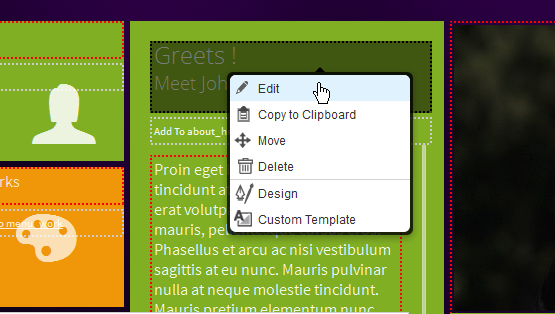
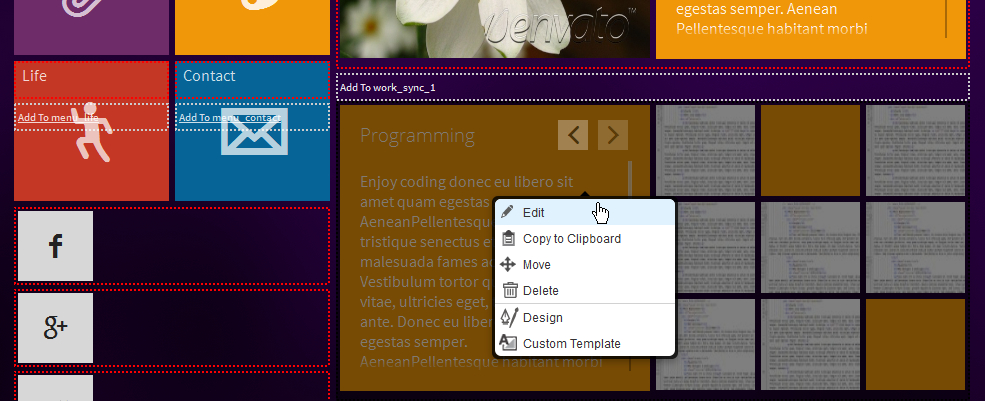
To edit a Menu item hover over the upper part of that menu item, on the text label. Left click there and a context menu should appear. Choose Edit from that menu. It's easier done than said...
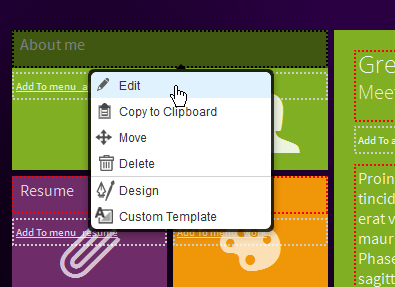
From here it's very intuitive: Change the title to what you want, pick any icon you want and you can also position the icon centered or at the right-bottom. Save if you want to save any modification, or cancel if you want to revert any modifications to this menu item.
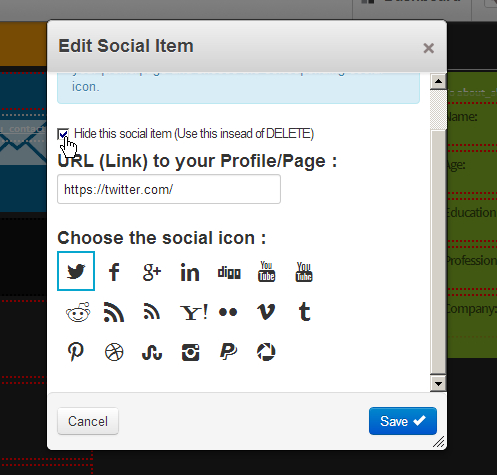
For the social item you want, you can change their icon and their URL of course, to point it to your actual social profile/page.
To edit a Social item hover over it, left click and then click Edit.
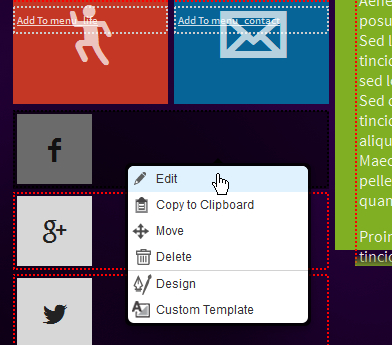
There are 20 social icons to choose from. You can have a maximum of 4 social icons. If you only need 2 or 3 of these, edit each social icon starting from the left (top , in edit mode) (for esthetical reasons) and choose Hide. Do not Delete ! In this way, the social item you want to have visible will allign to the right when you publish your edits.
About me
Edit the Greeting/ Welcoming headings.
After you made text changes, make sure that the heading above is a Heading 2 and the one below is a Heading 3.
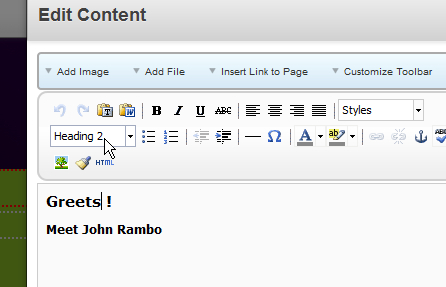
Edit the Biography and put as much content as you like. Use mainly paragraphs. Links are also possible.
Edit the image slider.
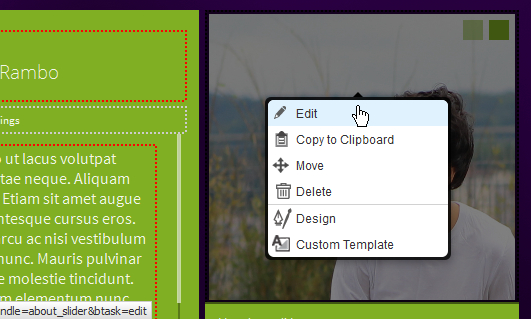
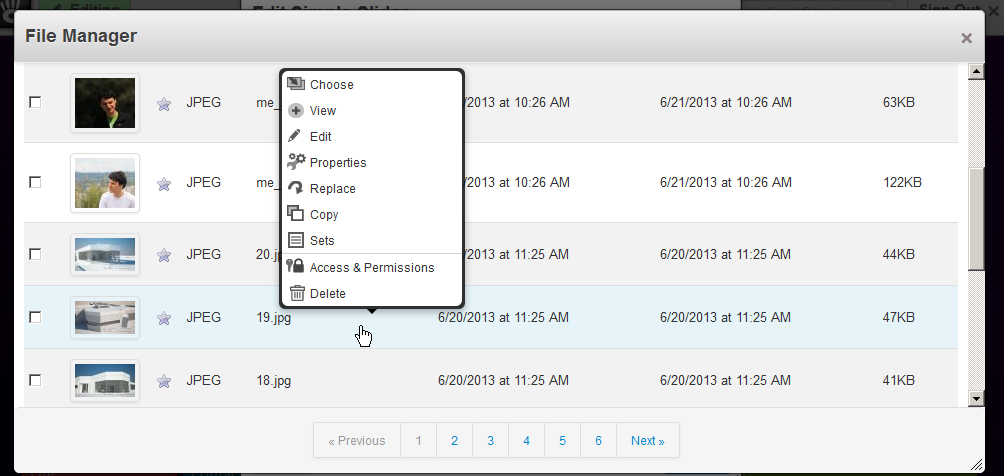
Use at least 2 images(slides). You can add, delete and rearange slides. It's very intuitive. Whenever you change an image or click the add slide button, the so called File Manager window appears. To select an image, left click anywhere in it's row and then click Choose from the context menu.
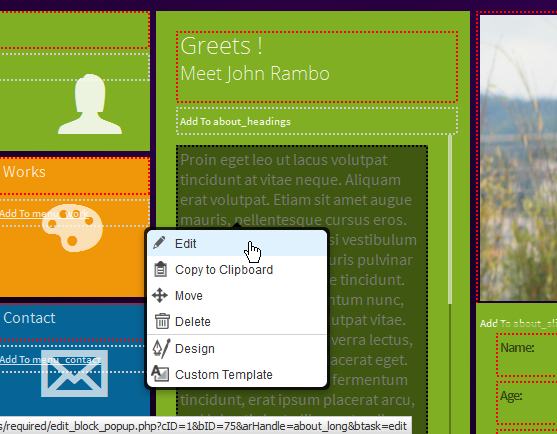
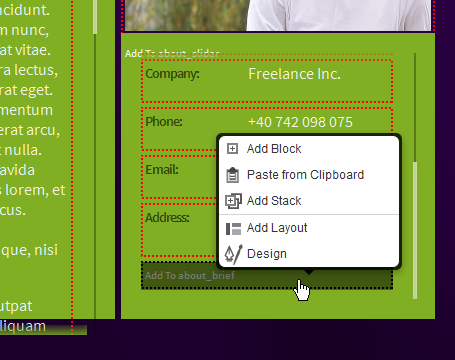
Edit a Pair. Left click on it, click Edit. Make modifications and save.
Delete a Pair. Left click on it, click Delete from the context menu.
Add a Pair. Scroll to the bottom of that box. Click on Add to about_brief. Click Add block. Click on Pair. Easy...
Now I would recommend you save what you've done so far ( Publish My Edits ).
Resume
Now that you have learned how easy it is to edit each piece of content (these are called blocks in concrete5), I will skip the too easy click Edit part.
Edit a Resume Entry. It's intuitive. No additional commenting necessary here.
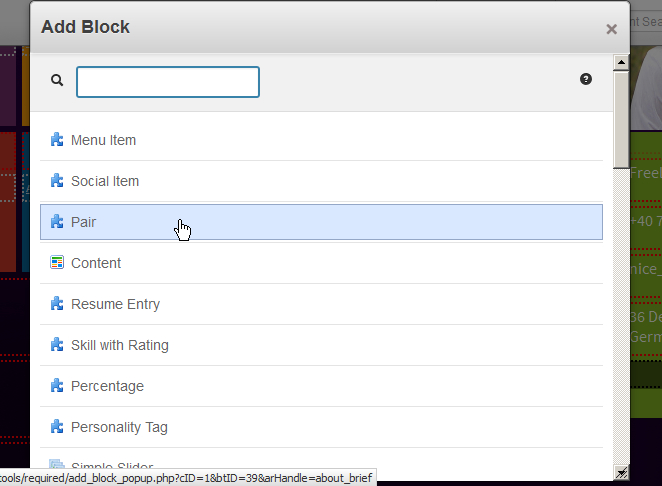
Add a Resume Entry. Scroll to the bottom of that box. Click on Add to resume_entries .Click Add block. Click on Resume Entry. Piece of cake...

Skills: As you can observe, Skills are organised in skill categories. A skill category has a title (which is a Content block) and subordonate Skills with Rating. You can use this structure, or you could delete al the titles for the categories, leaving you only with skills with rating. As you prefer. Edit and Add as you like. To Add, scroll to the bottom, and repeat the process you've learned.
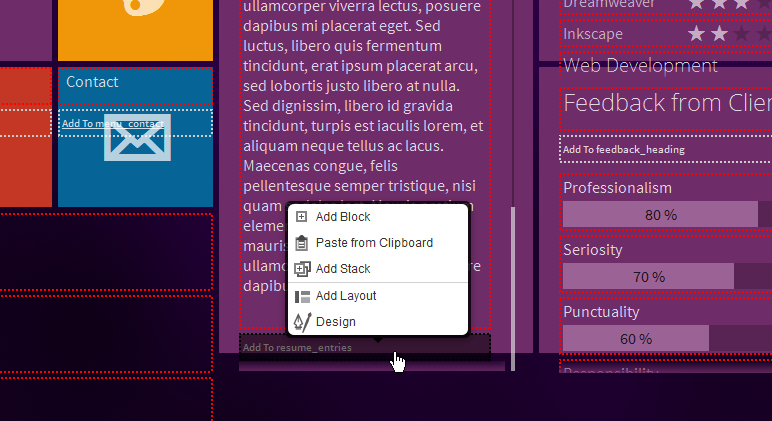
Feedback: You can Add/Edit/Delete Percentage bars. Very intuitive.
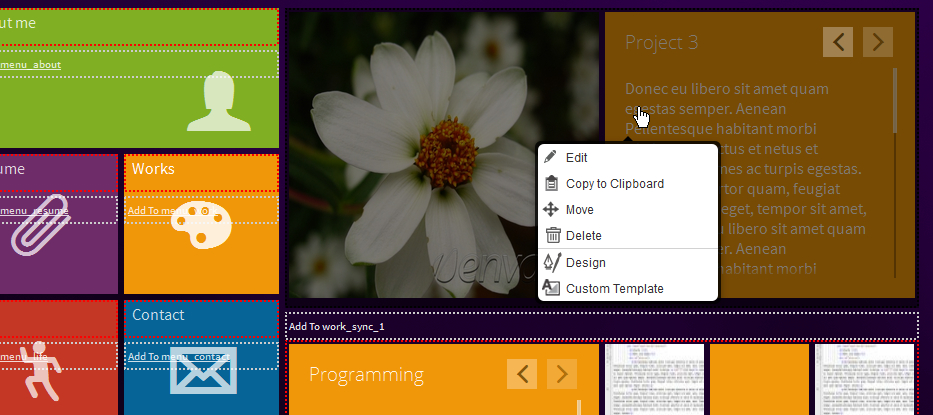
You want to rearange the order of certain blocks?... It's time to learn how to Move blocks: Left click on a block. Click Move from the context menu. Wait until the move cursor appears. Drag and drop the block where you want it moved. Wait a few moments. You should be notified (on the top right corner) that the block has been moved. Easy isn't it?
Now you know how to rearange any resume entries or skills or percentages you want...
Works
Here you will find two powerful ways of showcasing your work / portofolio.
In the works section there are 2 blocks:
- Synchronized Slider: Projects & Images (up)
- Synchronized Slider: Projects & Galleries (down)
Edit Synchronized Slider: Projects & Images:
Left click on it. Click on Edit.
You can Add / Delete / Rearange Slides as you like. You can also change the image for an already existing slide. It's very intuitive.
The idea is to have for one slide: a photo that depicts your project, a title and a description of your project. And you can add as many slides as you need. So basically you use one slide for one project / portofolio item.
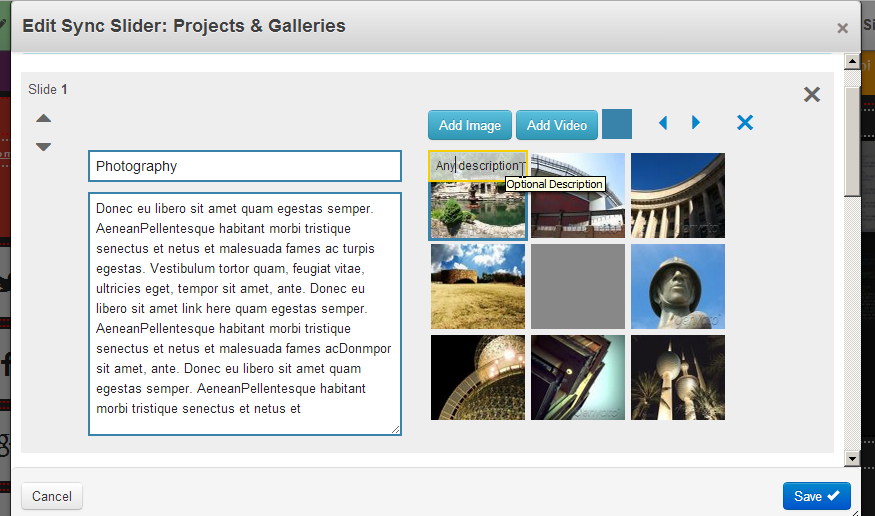
Edit Synchronized Slider: Projects & Galleries:
Left click on it. Click on Edit.
This is a more elaborate version of the Synchronized Slider: Projects & Images. You can Add / Delete / Rearange Slides as you like. You can also Add / Delete / Rearange thumbnails (image, video) and empty metro squares. It's easy to work with them, you have to click on the thumbnail you want to manipulate(move or delete) to select it and then use the buttons in the bar above.
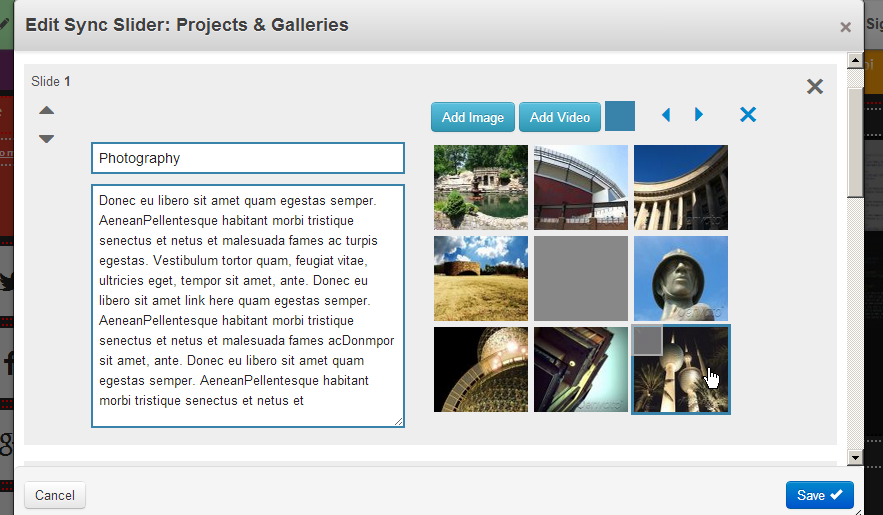
In a slide you can put thumbnails of all projects from the same category. Or you can use a slide to put multiple thumbnails of the same project. I'm only suggesting, this is not a limitation. Feel free to use it in any logical way you want.
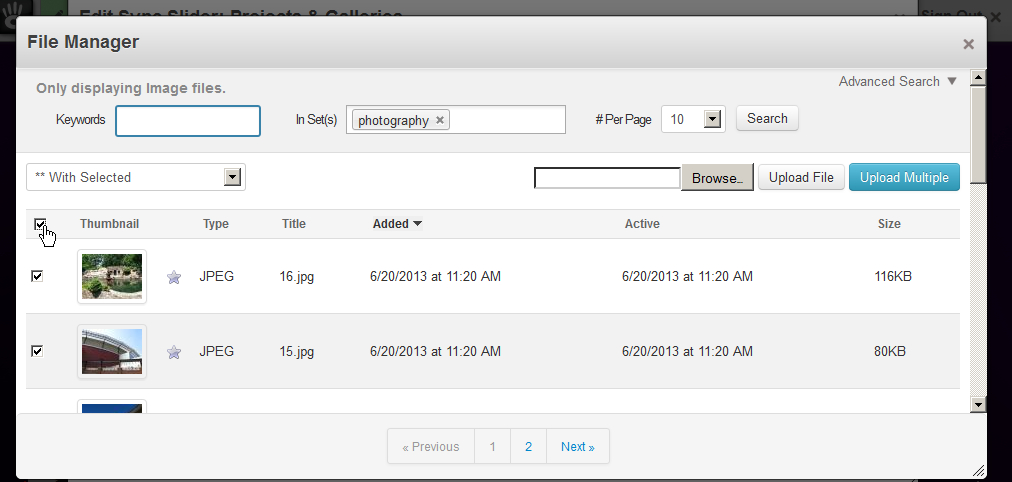
Adding thumbnails one by one takes alot of patience. Luckly there is a much faster alternative !
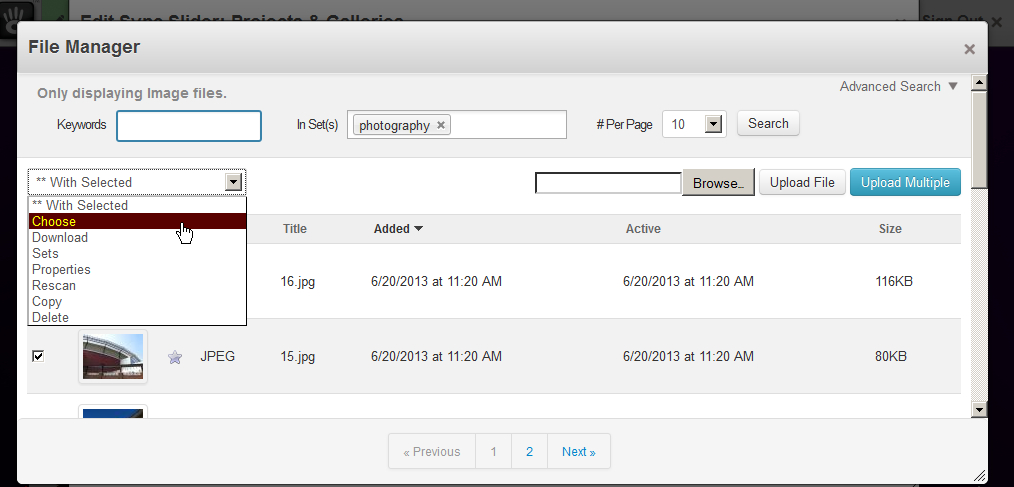
Create a new slide or delete all the thumbnails from a slide. Now click Add Image and the File Manager will pop-up. Filter the images by your desired Set (you had to create one previously). Click on the upmost checkbox to select all images. Click on the selection box where it says: " ** With Selected " and then click Choose. Good job! The same can be done to add multiple video thumbnails.

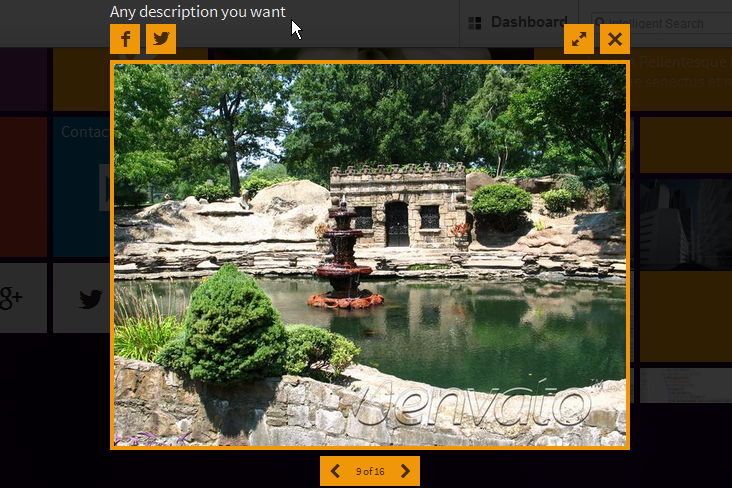
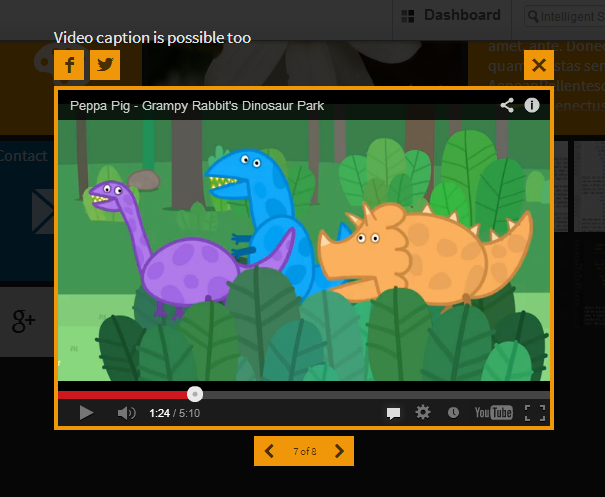
Each image thumbnail can have an optional image caption. When a visitor clicks on a thumbnail, the image gallery opens up. The captions are displayed at the top of the image while it is viewed in the gallery. To add a caption to a thumbnail, click on the thumbnail to select it and then click on the small square that appears on it's top left corner. Text added to that input will be the image's caption.
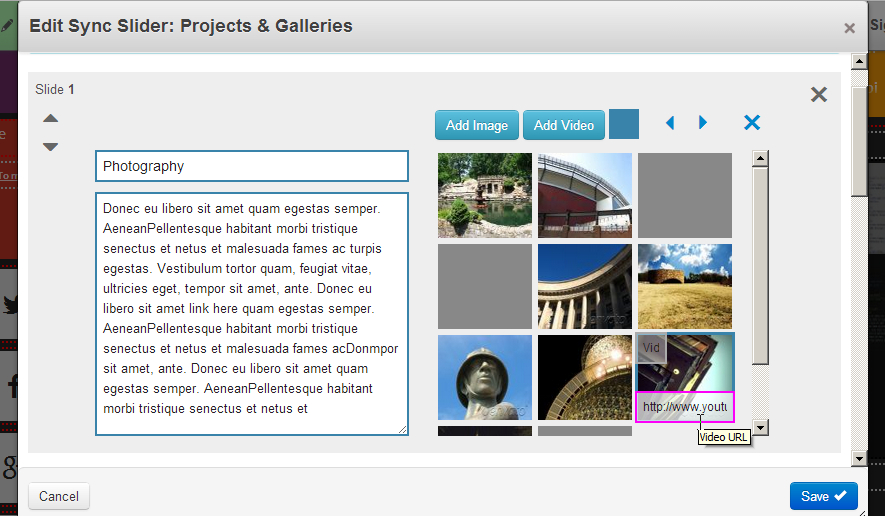
When adding video, the file manager appears and you are first required to choose a thumbnail image to represent that video.
The video thumbnail has an extra input in which you have to insert the video URL. Supports YouTube and Vimeo direct links ! Examples:
- http://www.youtube.com/watch?v=DfMYw33jph0
- http://vimeo.com/27654447
While typing inside the input, be careful not to add extra whitespace before or after the URL text. That would break the link...
Save the block. You have to publish the edits to test the video.
In the front-end, a video thumbnail is an image thumbnail with a play icon.
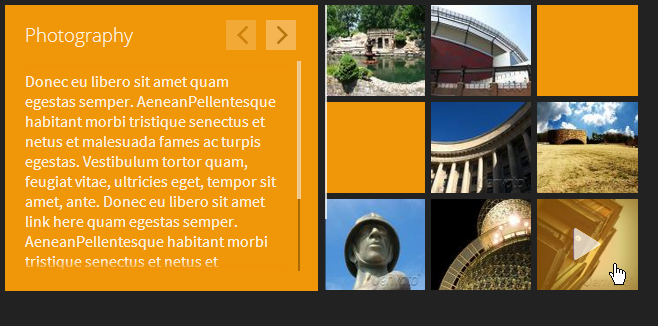
The video will be shown when the user clicks that thumbnail.
Life
Personality: Add / Edit / Rearange personality features (personality tags).
To add a Personality Tag, scroll to the bottom of the Personality box. Click on Add to personality_tags. Click on Add block. And choose Personality Tag from the Add block dialog window. Easy...
The Interests are just Percentage blocks, like in the Resume section. Add / Edit / Move / Delete as you desire.
Below these is the Synchronized Slider: Projects & Galleries from the Life section. It is the same type as the one from the Works section. To see how to edit the slider, proceed as in the case of the Works Synchronized Slider: Projects & Galleries (see above, in case you skipped it).
Contact
In the top-left box you have Pairs blocks. Add / Edit / Move / Delete as you desire.
In the top-right box you have the metroMe Ajax Contact form. Your site's visitors will be able to send you messages through this contact form. Ajax - means the page will not refresh when they send a message. (in simpler words: a very cool feature). Play a bit with the contact form before you try editing it. Exit edit mode (and publish any edits you've made). Navigate to the Contact section and play with the form. You will notice the send button changes it's text according to any errors in input. All these messages can be easily custoized in edit mode, by editing the form block. That's what I wanted to show you. Now go to Edit mode again and edit the metroMe Ajax Contact form.
Form Settings:
You will want to change the email adress where you want to receive the messages to be your actual email adress.
All the other settings can be modified as you like.
Google Map for metroMe
I have developed a special block for the Google Map, different from the standard concrete5 Google Map block.
In the standard block, the map gets automatically updated from your phisical adress input. But that is VERY IMPRECISSE. That is why I've decided to give you the ability to manually input your locations goecodes (your Latitude and Longitude).
Google Map for metroMe is more powerful, giving you the ability to preview the modifications you make to the Latitude and Longitude coordinates and also the map zoom level.
Edit the Google Map:
Click on the "Find the Latitude and Logitude..". button. It will open a new browser tab with a good external site I've found, that can give you your location's coordinates very easy.
Zoom on that map and drag around , until you reach your desired location. Then click the "Center Red Marker" button, or simply drag the red marker on the map and drop it where you like. The Latitude and Longitude inputs should update automatically. Copy those values and paste them in block Latitude and Longitude inputs.
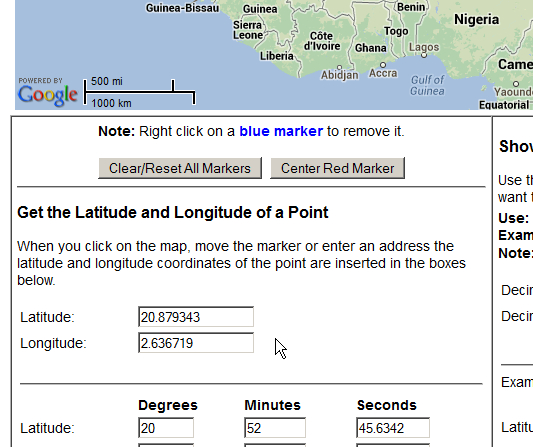
Then choose a map zoom level and click the "Refresh map preview" button. Play around with the map zoom value untill you have what you like. And in the end Save. I would say that's easy and PRECISSE.
Publish the edits and look at your map in the Contact section. Smile :)
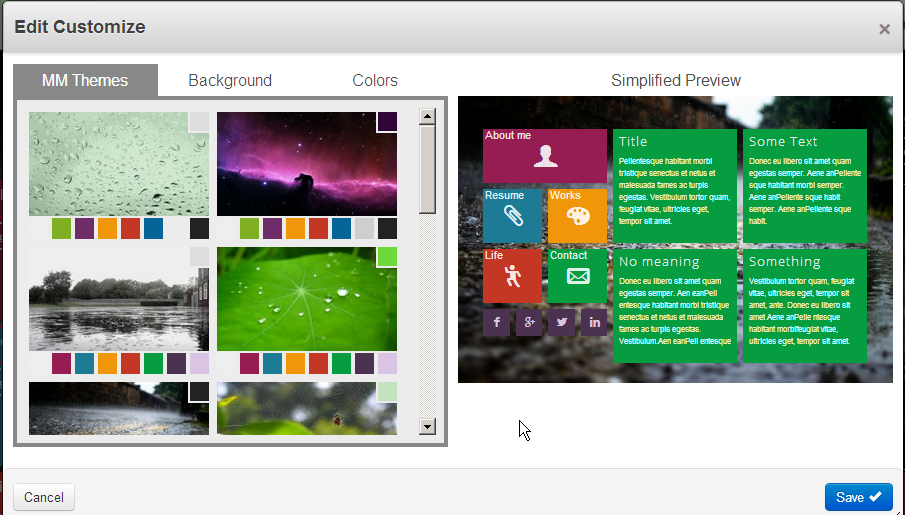
Customize
MetroMe comes packed with 29 hand-picked backgrounds and 15 pre-made "themes". They can be previewed with just one simple click. However, you are not limited to just these. Feel free to be as creative as you like by easily choosing a custom background image and playing with the colors.
You can easily make MetroMe your own...
Here is the Customize or Style Themes block as I called it.

On the top-right of the page there is the Customize block. Click it. Choose Edit from the context menu. And a new world apears before you.
Navigate using the tabs at the top-left. Preview your changes on the right side. After choosing a theme, you can choose a different background and change colors. When you are done, hit Save or cancel.
Easy, fast and powerful...
You can use any custom background image you like. Just use large images (around 1500 x 1000).
Enjoy being creative !
Settings
After you're done playing around adding and editing content to your site, it's time to optimize it for the visitors.
Write "cache" inside the Intelligent Search box and choose Cache & Speed Settings. Turn everything ON and for the last setting choose "Only when manually removed...".
You might also want to change the Site Name.
You can also delete previous Versions of the page/site. Leave 2 or 3 just in case...
Check out everything Concrete5 has to offer in the Dashboard menus. Also System & Security at the bottom left corner of the Dashboard opens up another menu. Explore...
Finish
Well this is the end...
Hope it didn't take too much time and effort for you...and I honestly hope you are satisfied by my work.
If you really liked it, I would much appreciate a nice comment on the item and/or a five star rating. (how to rate?)
And when your site is ready send me a link... I'm curious...
:)
Thanks !
Tudor